|
What's
all this I keep hearing about HDR? - A beginner's tutorial.
A Mr.
Richard Fader of Fort Lynn, New Jersey writes and says, Dear Roseanna
Roseannadanna, What the heck is this HDR stuff I keep hearing about?
Well,
HDR stands for High Dynamic Range, a photography technique that allows
you to capture both brightly lit and deep shadows within a single
finished image. Think of it
this way. You are standing
inside your beautiful living room and want to take a picture of it as
well as the view afforded through the bay window.
At the most basic level, you are either left with a blown out
landscape view and properly exposed interior or vice versa.
With
HDR, you can capture both. But it does take a bit of learning how to shoot the scene.
I wanted to write this quick lesson for those that are curious
and may want to give this a shot. This
tutorial is meant to allow you a starting point for capturing
proper images in preparation for the post-processing of an HDR
photograph.
First,
the equipment (bare essentials):
- Of
course, your camera (one that allows for manual exposure)
- A
remote cable release
- A
tripod.
Let me
preface this also that what I will be discussing is digital photography.
While you can also use film, it would require scanning the images
and probably providing exposure information to the program during
post-processing.
Why do
you call this equipment the bare essentials?
I say that because you can probably get much deeper into the
process, such as using a light meter to determine the varying exposure
necessities. This is
intended to be a basic tutorial.
So, if
you have a tripod, why do you need a cable release?
I have found that a tripod doesnt necessarily mean your camera
is perfectly stable. In
that you are attempting to capture the exact copy of a scene, any camera
shake may just destroy the whole sequence during post-processing.
I use a pro Bogen set up and just by pushing the shutter button,
get plenty of shake, especially when using a longer lens.
So it
is imperative that you eliminate any and all movement of the camera,
however slight. When using
your buttons/dial to change your exposure values during the sequence,
make sure you allow your camera to stabilize from any shake before
depressing the shutter.
Okay,
so now what? Well, the shot
itself. First, what is the
goal of your HDR shoot? Do
you have a darkened interior through a window or doorway that you want
to expose for? Or are you
inside but want to capture both interior and a landscape?
Or are you trying to capture a landscape that varies in light
from bright areas to deep shadows with a setting sun?
Keep in
mind you will need at least two different exposure values (Ev).
But I find the more the merrier.
I would say a minimum of three instead of two.
Oftentimes, I use a minimum of 5.
That would include +/-2, +/-1 and the mid-range shot.
So in essence I would be shooting 5 different photographs of the
same scene.
The
whole goal of this technique is to capture detail in varying light.
If you remember that rule, you will come away with a wonderfully
exposed finished product. So,
if the scene is stabilized (more on that later), why not use a full
range of stops at 1/3rd instead of stopping up/down at full
stop increments?
Next,
youll need to remember that if you are in an area where the majority
of your scene is bright (or dark), your on-board meter may be giving you
a false impression of needed exposure values.
So dont merely think that you can on-board meter for a scene
and just change your Ev based on that.
This is another important thing to remember and be cognizant of
while shooting.
Lets
say you have a dimly lit interior and only a fraction of the shot is a
brightly lit area, such as my shot seen here:
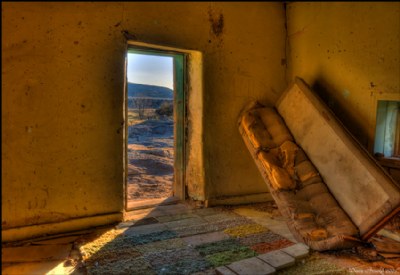
I was
shooting this at an ISO of 100, f 32.
The mid-range photograph had a shutter speed of 1/3 second.
Since the meter was averaging between light and dark, this left
me with a blown out landscape and a dimly lit room.
So I bracketed my exposures by 5 full f-stops on either side of
the normal exposure. With
the underexposure f-stops, I was able to darken the landscape.
With the overexposed f-stops, I was able to lighten the interior
of the room.
But by
understanding that the on-board meter is using an average, I decided not
to leave it to chance that Evs of merely 1 or 2 f-stops would be
adequate. So I exposed for
5 full stops on either side of the normal exposure. This later allowed for what I felt was a good finished
product.
Of
course, some may disagree with me and have.
But I am learning this technique as well and I do so by
visualizing my goal, practicing the technique and experimenting.
Keep that in mind while shooting for an HDR processed photo.
No sense getting back to your computer and finding out you should
have bracketed just a little bit more.
And, in
the processing of that finished product, remember, you can always drop
out some of the bracketed exposure shots and see what happens.
Digital is cheap, taking 20 shots of the same thing over and over
again isnt going to bankrupt you.
The above noted photo, for instance, was the result of 11
different bracketed shots.
And
what did I mean about stabilized scene?
Remember, you are shooting multiple exposures of the same thing.
So still-life subjects are most imperative.
Moving objects, such as a horse, person, car, etc are going to be
in different positions as you shoot and, when processed, are going to
show that motion. Unless
you are specifically after that effect, make sure you choose non-moving
subjects.
Also in
that regard, you are going to want to be cognizant of moving light.
If you have too much of a light change during your photography,
your results may be undesirable. So
you want to make sure that once you have begun taking your sequence, you
follow through with pretty rapid shots.
Learn your camera and what you need to do to change the exposure
levels. I know on my Canon
30D, three clicks on the wheel will drop me down (or up) 1 f-stop.
But dont forget to let your camera settle from the shake
of changing settings.
Now
that you have your shot and have a good grasp on the theory and
technique, what next? The
post-processing is next of course.
One of
the available software programs for HDR is Photomatix.
It is, what I use. It
retails for $99 US but you can also find on-line coupons for 15% off
bring the cost down to about $84. You
can trial-use the program but it leaves watermarks on your photograph.
It was worth it to me just to buy it. I also understand CS3
has tone mapping abilities as well.
Photomatix
comes with both a quick tutorial and an Adobe Users Manual.
So far, I havent had time to go through the users manual.
The quick tutorial was enough to get me started and to start
experimenting.
First
you need to generate your image by choosing the files that you
shot using the top menu under HDR. I have learned that it is much easier on your brain if, when
shooting, you always start with the most underexposed (or overexposed)
shot of the sequence. This
way, when reviewing the thumbnails of the sequential shots in your file
browser, you can easily identify which series represents the particular
photograph you want to process. You would simply see them in exposure
order and be able to select them for generating much easier than opening
each file and reading EXIF data or trying to compare a slight camera
position change from one series to another.
And,
when you generate the sequential photos in Photomatix, you select file
names instead of thumbnails. So
having them in some easily identifiable order in your file browser, you
will find, is going to be very helpful.
Believe
me, if you have shot the first sequence of shots beginning with the
underexposed and finishing with the overexposed and then gone on to the
next series but start with the overexposed and work toward the
underexposure, it will cause you to pull your hair out when trying to
generate the HDR file. I
always try to remember to go back to the opposite of what I finished one
series with.
It also
seems that you do not have the ability to select anything but a sequence
of photographs when generating. In
other words, if you had a sequence of photos number 100 to 110 but only
wanted to use 100, 102, 104, 106 and 110, it will not let you select
just those. At least not
from what Ive found. You
may be able to put in the whole sequences of 100 through 110 and then
delete unwanted files from the generating list but I have yet to try
that.
Once
you have generated the photo from your files, a box will appear that
gives you an un-toned view of the merged files.
This will typically look terrible, nothing like you expected.
But it does give you a preview of the merged files and whether or
not they are the correct files. If,
for instance, you accidentally added a file from your next sequence
after moving your camera, you will see that the pictures are not
aligned. If they are, it is
suggested you save the file (it saves as an HDR file).
With that saved, you can always open it up later and make
different tonal adjustments than what you initially make.
Considering
that the new HDR file contains the sequential photos, you now select
tone mapping from the HDR menu at the top of the program.
This now opens up an adjusting box.
Right from the start, you will see a major difference in the view
of your finished product.
This
tonal adjustment box has several sliders and adjustments to make.
This tutorial is not intended to help you through that.
The quick tutorial that comes with the program and the user
manual should allow you the benefit of understanding what to do.
As a
side note, one of the problems I see with the program is that the view
of the photo during the adjustment phase is limited to 1024 maximum.
When it opens, it will be in 512 view. You
change the preview size to either choice of 768 or 1024 so you can see
what you are doing. With a
big screen I find it annoying to not be able to see a bigger view than
the 1024.
In
doing the tone mapping, I find that using only the Detail Enhancer mode
(method) is best. When
trial-using this program and following the quick tutorial, it instructed
the user to make adjustments in detail enhancer mode and then switch to
Tone Compressor mode (method).
Try doing that. What
you find after making all those adjustments is that it drastically
changes your finished product.
The
Tone Compressor mode gives you the ability to change the photograph on a
global scale. It was very
aggravating to then have to go back and make new adjustments within this
mode. But if you are using
the trial version, it will be your only option of getting a processed
photo without a watermark.
Now
that I am not using the trial version, I have learned to save the file
once my Detail Enhancer mode adjustments are made.
Now
that you are happy with the finished product, you select apply in
the toning box. It goes
through its magic, closes the box and brings up another wherein you can
save it as a jpg file, renaming it if you want.
I usually leave the name as assigned because it will give you the
photo numbers of the files included and it is an easy way to determine
how many you combined. Your
original photos are not affected by this save, by the way.
Once I
have finished saving the file, I then go to Photoshop and proceed with
any touch-ups, etc. and complete it as I would any other photo (such as
Unsharp mask, cropping, hot pixels, etc.) and then save it to conform to
my file naming system.
I hope
I have covered most of the basics here and gladly will answer any
questions or welcome any other information anyone has.
As of
this writing, here are some examples of some of the HDR photographs I
have experimented with and completed:
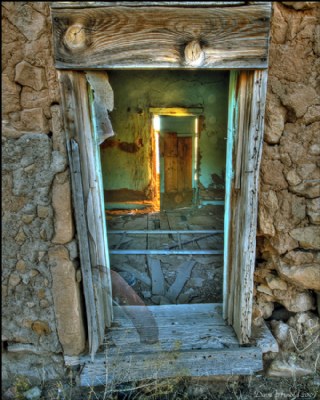
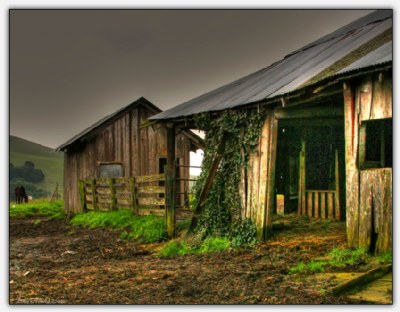
Shooting
from shaded exterior to dark interior with backlight coming through the
opposing partially open door.
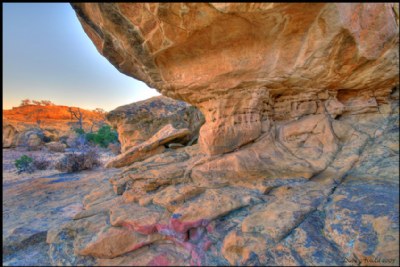
Shooting
totally shaded rocks with high glow of sunset in background
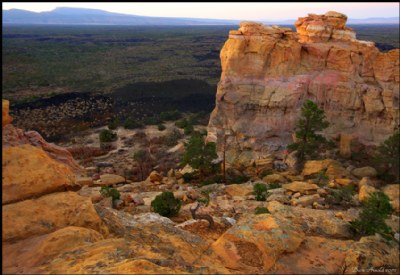
Shooting
landscape during sunset with many shaded areas and contrasting colors.
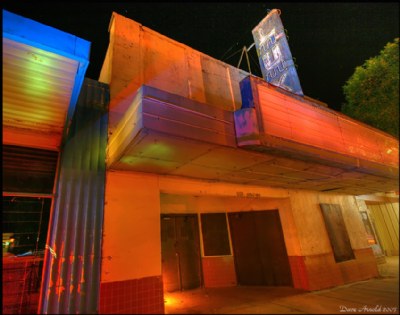
Combining
three night shots wherein the light painting I had done was not
complete in each photograph due to exposure length constraints
(Night
shots in HDR are very hit and miss; Ive found most night shots
dont work with this technique)
Using
a single photograph, copied three times with exposures manually set in
the generating process.
Using
a single photograph, copied three times but lightened and darkened in PS
prior to generating the image in Photomatix.
I hope
this helps as a beginner course for those interested in HDR technique.
|
|
| PERFECT
for Photoshop & HDR work! |
 |
 Hope you enjoy your visit
 |
Copyright © 2010 Dave Arnold.. All Rights Reserved
|
|
|